Puzzle-Generator Windows Tool to create your own puzzles and crosswords.
Generate your own crossword puzzle in 10 steps
With the help of Puzzle-Generator you can easily build your own crossword puzzle in just a few steps - with individual questions and answers, including your own solution text. The result can be formatted in a modern way. You can also add photos or blank boxes and print the result or export the created puzzle as an image, e.g. Jpeg file, or directly export the crossword as a Word file (.docx). Make great puzzles with your individual touch and personal words. Use it for the wedding newspaper or as a gift for birthday or Christmas.
Tutorial
The following tutorial shows you how to create your own crossword with Puzzle-Generator in 10 steps:
Step 1: Select puzzle type and create a new puzzle
- After download and installation, start the Windows program Puzzle-Generator from the Start menu.
- Use the menu item "File → New Puzzle" or the corresponding toolbar button
 to create a new project.
- A new dialog window opens where you can select the appropriate type of puzzle "Crossword". A blank crossword puzzle is generated and the program interface changes.
Step 2: Enter your own questions and answers
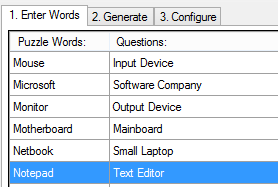
- You need to define the words for the fields in the crossword puzzle. This can be done in the editor under "1. Enter Words".
- The right column holds the relevant questions for the puzzle words. Later, you can decide whether these questions are directly shown inside the puzzle grid or numbers are shown instead.
Step 3: Optional: Import words from Microsoft Excel
You can also work with Microsoft Excel or your favourite text editor to edit your word list and import the file into Puzzle-Generator.
- When using Microsoft Excel the sheet must have a specific structure: two columns, only one sheet, no text formatting.
- The first column holds the puzzle words, the second column holds the questions.
- In Excel save on "File → Save As" and choose the file type "CSV (comma separated value)".
- When using text files separate two columns of each line with a ';' semicolon (comma separated value).
- Here is a sample file that can be opened with Microsoft Excel or a text editor.

- In Puzzle Generator you can import the words in the tab "1. Enter Words" with help of the "Add From File" button. Select your CSV file.
- The words of the file are added to the list and are available for editing.
Step 4: Define grid size and other options
After you have entered all words and questions you can start the generation of a new crossword puzzle.
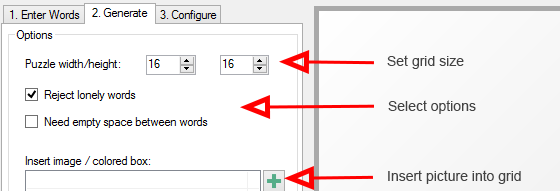
- Switch to the tab "2. Generate" and set the size of the crossword grid, for example 16x16.
- Select whether you want to "Reject lonely words" (lonely words have no overlapping fields with other words).
Step 5: Optional: Add your own Photos
To give your crossword a more personal touch you can insert your own photos inside the grid of the crossword.
- Go to the second tab "2. Generate" and click on the plus button
 to insert a new image or a colored area in the crossword grid. A new dialog appears.
 - Set the position for the image / color box and define its width and height.
- Use the browse button "..." to specify the location of the image file.

Step 6: Generate the puzzle and check the result
In this step the crossword puzzle is generated. Navigate to the tab "2. Generate".
- When the generation process has finished a preview of the created crossword appears on the right. Below the Generate button you will find further details about the result (number of used words, free fields...).
- Tip: You can save "Used words" or "Unused words" in a file via a right-click.
Step 7: Enter the solution text
You can define an individual solution text for your crossword. 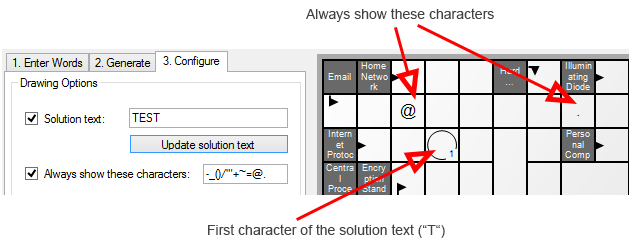
- Switch to the tab "3. Configure" and enable the check box "Solution text". Enter your own solution text in the adjacent field.
- Use the button "Update solution text" to select other random fields for the solution text characters.
- All letters of the solution text must appear in the crossword puzzle. You will see a red error message if not all letters are available (or the solution text is too long).
- Tip: It is also possible to display a certain list of characters in the puzzle, e.g. to always show hyphens, slashes or other special characters.
Step 8: Customize colors, fonts and appearance
With Puzzle-Generator it is possible to customize the look of your crossword in several ways.
- Select the tab "3. Configure" and go to the settings fields.
- Configure colors, size, boxes, fonts and much more.
- Choose a smooth gradient as background.
- Play around with the settings of Puzzle-Generator.
Step 9: Saving and Printing
Once you have a crossword puzzle generated you should back up your work and save the project.
- Select "File → Save" or the corresponding toolbar button
 to save the current crossword puzzle in a file.
 - You can restore the file via "File → Open" and continue editing.
- To print your crossword just navigate to "File → Print" or the corresponding toolbar button
 . Do not forget to select your printer in the Print dialog!
Step 10: Optional: Save your crossword as a Word document
To edit the generated crossword with other programs, you have different options:
- Use the "Export" button to save image files (such as JPG, PNG or BMP) which you can open into an image -processing or page layout tool.
- Use the menu item "Options → Save Word Document" or the corresponding toolbar button
 to save the puzzle as a Word document (.docx). The .docx file can then be opened with Microsoft Word for further editing.